Cloud Onboarding
Cloud Onboarding
AWS (Amazon Web Services)
- AWS Free Tier
- AWS Academy
- official certification training material
- labs (Vocareum)
- AWS Educate
GCP (Google Cloud Platform)
There is a 12-month free trial with $300 credit to use cloud services. In addition, there are many cloud resources that are in an Always Free tier.
Qwiklabs is a lab solution that is used by Google education and also AWS Education (less frequently though since Google purchased Qwiklabs). Both the faculty and students at Universities can request “free” Qwiklab credits. For users without a “.edu” address, they can also purchase Qwiklab credits or often get them for free at a training event.
Qwiklab Gotchas
There are a few non-intuitive gotchas about Qwiklabs:
- To get “free” Qwiklab credits from a university you will need to use the .edu address your university provided.
- The credentials Qwiklabs generates when a lab is created are temporary and ephemeral. These credentials
- DO NOT USE UNIVERSITY EMAIL to log into GCP. Typically the IT department has setup GCP to restrict any usage of GCP with a .edu address.
- You will need to keep Qwiklabs open and follow the lab instructions as you log into a new GCP login using the temporary credentials.
Exercise
- Topic: Onboard to AWS and GCP Labs
- Estimated time: 15 minutes
- Slack Channel: #noisy-exercise-chatter
- Directions:
- Part A: Log into Qwiklabs and run a lab you haven’t run before. Paste a screenshot into slack of something interesting you found.
- Part B: Log into Vocareum and run a lab you haven’t run before. Paste a screenshot into slack channel of something interesting you found.
- (Optional for the ambitious): Use what we learned about effective technical communication and write this up in Github as brief tutorial. Share this “post” instead of the raw screenshot.
Setup Cloud Environment Continuous Integration from Zero
DEMO VIDEO HERE OF ENTIRE PROCESS: 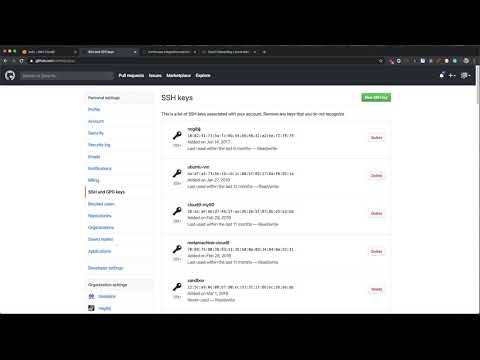
Using cloud based development environments solves many significant problems:
- Security Roles are simplified
- Faster communication pathway
- Enhanced IDEs and productivity with cloud environment.
The FIRST thing that should be setup with any new cloud development project is a Continuous Integration.

Helpful shell commands to know!
There are few helpful shell commands that come in handy in this tutorial and will come in handy on many environments.
- The
cdcommand. This let’s you change to a directory - The
pwdcommand. This prints out the full path of where you currently are. For example the output of the command run in the Cloud9 environment shows.
ec2-user:~/environment $ pwd
/home/ec2-user/environment
- The
echo $HOMEcommand shows what the path of$HOMEvariable is set to. For example this is the output on AWS Cloud9.
ec2-user:~/environment $ echo $HOME
/home/ec2-user
- The
ls -la .command will list all files in the current working directory, including invisible files that start with a.as shown in AWS Cloud9
ec2-user:~/environment $ ls -la
total 24
drwxr-xr-x  5 ec2-user ec2-user 4096 Jan  8 16:50 .
drwx------ 17 ec2-user ec2-user 4096 Jan 21 13:46 ..
drwxr-xr-x  4 ec2-user ec2-user 4096 Jan  8 16:50 .c9
drwxr-xr-x  5 ec2-user ec2-user 4096 Jan  8 16:50 jan8
drwxrwxr-x  6 ec2-user ec2-user 4096 Jan 21 13:52 python-devops-course
-rw-r--r--  1 ec2-user ec2-user  569 Dec 24 16:04 README.md
ec2-user:~/environment $
Setup and use Github
NOTE: FOR AWS CLOUD9 THE DIRECTORY WHERE THE CLOUD EDITOR SHOWS CODE IS ~/environment or /home/ec2-user/environment
To setup and use Github you need a Github account and internet access. The minimal steps to start are:
- Create a repository, for example
hello. - Add an SSH key to your Github account.
- Clone the repository locally, for example:
{caption: “Clone a repo”}
git clone git@github.com:paiml/hello.git
- Create a change and push it. This would be an example of a good first change (inside the cloned repo).
{caption: “Clone a repo”}
echo "# hello" >> README.md
git add README.md
git commit -m "adding name of repo to README"
git push
Setting up and using Virtualenv
The Python standard library includes a module called venv. A virtual environment solves a very important problem in Python. It isolates the Python interpreter to a specific directory. In this example a virtual environment is created in a user’s home directory.
{caption: “Create Hello World Virtual Environment in Python”}
python3 -m venv ~/.hello
To use this virtual environment it needs to be activated.
{caption: “Activate Hello World Virtual Environment in Python”}
source ~/.hello/bin/activate
Using a repeatable convention to create virtual environments
Conventions are a powerful way to simplify complex software engineering tasks in a series of easy to remember steps. A convention based workflow with virtual environments can also dramatically simplify using them. Here is a simple convention to use:
- Create a virtual environment with a
~/.[reponame] format
This removes the decision about where to put the virtual environment and what to name it. If your git repository is called hello, then you would run the following command:
python3 -m venv ~/.hello
Note, that the . makes the virtual environment invisible. This will prevent your home directory overflowing with virtual environments when you open it in a GUI or list the contents with ls -l.
- Create an alias in your Bash or ZSH environment.
With ZSH, the config file to edit would be ~/.zshrc in Bash it would be ~/.bashrc. Inside of this config file add the following:
{caption: “Create an alias for Git repo and virtual environment”}
## Hello repo
alias hello="cd ~/hello && source ~/.hello/bin/activate"
The next time you open your default shell, this alias will be available. Here is an example of what this workflow looks like on my ZSH environment, which uses a package called oh-my-zsh.
{caption: “Use alias that performs cd and activates hello virtual environment”}
➜ hello
(.hello) ➜  hello git:(master)
(.hello) ➜  hello git:(master) which python
/Users/noahgift/.hello/bin/python
This convention based workflow, if followed, makes a tedious and error prone process easy to remember.
Setup Makefile
Just like vim, mastering Makefiles can take years, but a minimialstic approach provides immediate benefits. A main benefit to a Makefile is the ability to enforce a convention. If everytime you work a project you follow a few simple steps, it reduces the possibility of errors in building and testing a project.
A typical Python project can be improved by adding a Makefile with the following steps: make setup, make install, make test, make lint and make all.
NOTE: YOUR ENVIRONMENT WILL BE DIFFERENT. IN THIS EXAMPLE THE .myrepo WOULD BE REPLACED BY THE NAME OF THE VIRTUAL ENVIRONMENT YOU CREATED. THE lint SECTION WOULD NOT HAVE myrepolib IT WOULD BE THE NAME OF YOUR LIBRARY OR CODE.
{caption: “Example Makefile”}
setup:
	python3 -m venv ~/.myrepo

install:
	pip install --upgrade pip &&\
		pip install -r requirements.txt

test:
	python -m pytest -vv --cov=myrepolib tests/*.py
	python -m pytest --nbval notebook.ipynb


lint:
	pylint --disable=R,C myrepolib cli web

all: install lint test
This example is from a tutorial repository called myrepo. There is also an article about how to use it from CircleCI.
TIP: When editing a Makefile make sure you use tabs. In AWS Cloud9 you can toggle the gear icon to do this. For other cloud editors make sure to toggle to tabs.

You can watch the following screencast on how to setup a Data Science build system:
The general idea is that a convention eliminates the need to think about what to do. For every project, there is a common way to install software, a common way to test software and a common way to test and lint software. Just like vim, a Makefile build system is often already on a Unix or Linux system. Even Microsoft uses the Linux operating system in Azure, and the result is that Linux is the preferred deployment target for most software.
Integrating a SaaS Build Provider
There are many SaaS Build providers that can be used for Continuous Integration: CircleCI, Github Actions and the build providers of the cloud platform itself like AWS Code Pipeline.
For public open source projects, like a student portfolio, using a free provider like CircleCI or Github Actions is a good idea for every single repository that is created.
Setup CircleCI
The steps to setup CircleCI are outline here, but at a high level it is:
- Authenticate to CircleCI with Github account credentials
- “Add Project”
- Copy and edit
.circleci/config.ymlin development environment. - Run build from CircleCI manually to test (then it should be automatic)
- Integrate build badge in Github README.md
One tricky item is that you will need to “toggle” editing hidden files if you are using a cloud editor like AWS Cloud9 or Google Cloud Shell. With AWS Cloud9 you right-click on the left pane folder here as shown here to toggle hidden files:

Afterwards you should be able to edit a hidden directory like .circleci.

Extending a Makefile for use with Docker Containers
Beyond the simple Makefile, it is also useful to extend it to do other things. An example of this is as follows:
{caption: “Example Makefile for Docker and Circleci”}
setup:
	python3 -m venv ~/.container-revolution-devops

install:
	pip install --upgrade pip &&\
		pip install -r requirements.txt

test:
	#python -m pytest -vv --cov=myrepolib tests/*.py
	#python -m pytest --nbval notebook.ipynb

validate-circleci:
	# See https://circleci.com/docs/2.0/local-cli/#processing-a-config
	circleci config process .circleci/config.yml

run-circleci-local:
	# See https://circleci.com/docs/2.0/local-cli/#running-a-job
	circleci local execute

lint:
	hadolint demos/flask-sklearn/Dockerfile
	pylint --disable=R,C,W1203,W1202 demos/**/**.py

all: install lint test
A Dockerfile linter is called hadolint checks for bugs in a Dockerfile. A local version of the CircleCI build system allows for testing in the same environment as the SaaS offering. The minimism is still present: make install, make lint and make test, but the lint step is more complete and powerful with the inclusion of Dockerfile as well as Python linting.
Notes about installing hadolint and circleci: If you are on OS X you can brew install hadolint if you are on another platform follow the instructions from hadolint/ To install the local version of circleci on OS X or linux you can run curl -fLSs https://circle.ci/cli | bash or follow the official instructions for local version of the CircleCI build system
Exercise
- Topic: Setup Continuous Integration Round-Trip from Cloud Environment
- Estimated time: 30+ minutes
- Slack Channel: #noisy-exercise-chatter
- People: Individual or Final Project Team
- Directions:
- Part A: Using a Cloud Development environment: GCP Cloud Shell or AWS Cloud 9 setup a Github Project and create:
- Makefile
- hello world script
- lint it with
pylint - hook up Circleci and
linton checkin
- Part B: Document your setup and share via post on slack.
- Part A: Using a Cloud Development environment: GCP Cloud Shell or AWS Cloud 9 setup a Github Project and create:
Exercise
- Topic: Create Continuous Integration
- Estimated time: 20-30 minutes
- People: Individual or Final Project Team
- Slack Channel: #noisy-exercise-chatter
- Directions:
- Part A: Log into Qwiklabs and run a lab you haven’t run before. Paste a screenshot into slack of something interesting you found.
- Part B: Log into Vocareum and run a lab you haven’t run before. Paste a screenshot into slack channel of something interesting you found.
- (Optional for the ambitious): Use what we learned about effective technical communication and write this up in Github as brief tutorial. Share this “post” instead of the raw screenshot.
Onboarding Day Prize
- Best technical discussion (as voted by peers in slack via “likes”) gets AWS Deep Lense.

- Can group (your team) or individual submission.